Translate

Showing posts with label Accompaniments/Appetizers. Show all posts

Thursday, February 11, 2016

GF Tofu Puffs in Lemongrass 5 Spice Chinese BBQ Sauce with Sautéed Vegetables

                    
Good morning beautiful people!
As promised I am posting the delectable recipe to accompany the sauce I posted earlier this week. This is such a delicious powerhouse of flavours, a perfect vegan and gluten-free dish. It gets the tasty yummies from this glorious sauce, which has a sweet and salty BBQ fullness:
                   
You're going to need the recipe for this sauce before you can begin, which works in 3 steps. Seems complicated but it's not, if you want full flavour, you're going to need to do this right. Link is here:

Make your favourite rice in advance, I like white or brown Jasmine rice. This is going to be a requested dish in your home, have fun testing it out for Valentine's day!

GF Tofu Puffs in Lemongrass 5 Spice Chinese BBQ Sauce with Sautéed Vegetables
(You must have all ingredients prepared and move quickly when cooking because it does not take long to cook and the puffs cool quickly, so they must be served as soon as they and the vegetables are done.)

Ingredients:
4 Tbsp sesame oil (not toasted)
1/4 tsp toasted sesame oil
1 1/2 pkgs. Tofu puffs aka fried tofu
1 large red pepper, diced
1 large onion, diced
2 cloves garlic, one thinly sliced and one crushed in garlic crusher
1/3-1/2 Cup Chinese BBQ sauce
1-2 Tbsp tapioca starch mixed with just enough water to make a thick paste
8 leaves Chinese cabbage
1 Cup broccoli florets
6 Shiitake mushrooms sliced
1 small knob fresh ginger cut into slivers
1 vegetable stock cube
3 Tbsp soy sauce
1 Tbsp tapioca starch mixed with 2 tsp water
3 stalks scallion ( green spring onion) slivered thinly on an angle
3 tsp sesame seeds of choice ( I like black, as it is more striking)

This is what the tofu puffs look like, I got them at my local Asian markets.
                        

Method for Tofu Puffs:
- In a wok or pan heat 2 Tbsp sesame oil (not toasted) sauté half of diced onion, keeping other half aside for vegetables.
- Add red peppers, ginger, sliced garlic (not crushed clove, it's for vegetables) and sautéed one minute.
- Add tofu and sautéed one minute.
- Add sauce and stir through, cook for 1 minute and add 1-2 Tbsp tapioca starch slurry. ( not both, one is for vegetables) Cook for 1 minute until thick, remove from heat and keep covered. 
                          

Method for Sautéed Vegetables:
- In a wok heat 2 Tbsp sesame oil and 1/4 tsp toasted sesame oil
-Add remaining onions and cook on high heat for 1 minute, add in other vegetables and stir well.
-Add garlic and stir through, cook for 30 seconds and add stock, then add soy sauce, stir through.
-Add tapioca slurry and cook until just thickened, serve with tofu and rice immediately.
-Sprinkle slivered green spring onion over all with sesame seeds sprinkled as well, just before serving.


Veg and tofu prepped and ready to grab as I cook. It's important to have it all at the ready before hand.
                      
                                                       Tofu puff magic!
                      

                                  I made sides of rice and sautéed vegetables. 
                       

                                                     Pretty and waiting to be devoured!
                       
                                         The tofu looks like this when you bite it!
                       
                                        I made a variation with Chinese broccoli.
                            
                                              The original is still deelish!
                         
Who knew tofu could be this good? I did haha!
I hope this inspired you, trust me, the meat mouths are gonna love it! I feel this is a nice meal for two, it would be a pain-free way to have a vegetarian Valentine's with your special someone.
Leave your comments down below and let me know how this turns out for you.
God bless and don't forget to be fearless in the kitchen.


Monday, August 10, 2015

Lime & Ginger Basil Minted Pineapple Salsa


Sunday was my cheat day and I decided that seasoned potato galettes would be my splurge accompaniment to my fish, which I jazzed up with a particularly delicious salsa. I had mint, basil, and ginger, so I decided to play with a topping that would be light and refreshing. I used pineapple and came out with a mouth popping salsa that didn't need to rely on heat for flavour, which is perfect because as much as I adore spicy food, my eczema does not appreciate it at all. This is a great alternative if you are on an autoimmune protocol diet as well, Ginger and mint are great for digestion and the lime pairs nicely with all the other ingredients.

LIME & GINGER BASIL MINTED PINEAPPLE SALSA:

Ingredients:
1 1/2 Cups Chopped Sweet Pineapple
1/2 English Cucumber, peeled & shaved
8 Basil leaves
8 Mint leaves
1/4 Cup pineapple juice
1/2 Lime zested
1/2 Lime juiced
1 tsp Ginger freshly grated
2 Stalks green onion, sliced
3 Tbsp Extra virgin olive oil

Method:
-Combine all in a non reactive bowl
-Chill for an hour
-Serve with chips, on fish or chicken.


Friday, August 7, 2015

Elderflower Gingered Peach and Jalapeño Salsa


Helloodles lovelies!
I know the recipe title is a mouthful to say but it's a delight to eat.
You need to add this to your roster of summer recipes. I was at Ikea the other day, discovering bedding and cool things for my Poppa Bear and I to have in our home together. Man,is it ever easy to go crazy in there, I never knew how much I missed decorating my home until Ikea brought it all back.
By the cashes, I remembered that they sell elderflower syrup and I rushed to grab one in their food section, before we left. I was so happy when I found a bottle and it was just under $5,which is much better than the $12-$18 bottles I had seen. It was also not too big which is perfect for me because I will not be needing that much. There were recipes on Pinterest for elderflower and I had almost forgotten about this lovely ingredient, I usually imbibe it in my elderflower presse drink during the holidays. It's been my go-to alcohol replacement for years, for me and the kids table. I get eczema badly when I drink alcohol so it's off my list.
Well, now I am using elderflower syrup on a new recipe journey, trying new things keeps your soul young after all. If you have never heard or had this, I truly feel you are missing out.
I adore it, it's a flower that has a delicate, soft and inviting flavour. It's a bit acidic but in a mild limey tang kind of way. It does not overpower, it's actually mellow so don't pair it with anything too strong. It works well with lime & some ginger. I hope you enjoy the recipe and please don't be intimidated, I put many pictures that breakdown how to cut and use everything. It's actually not a difficult one just requires patience, extra cutting time, and of course, love. Never cook or bake without love.

ELDERFLOWER GINGERED PEACH AND JALAPEÑO SALSA

Ingredients:

4 ripe peaches (not over ripe)
1/2 jalapeño
1 English cucumber
1 stalk whites of scallion
Small piece of red pepper (1/4 cup chopped)
1 tsp ginger (fresh)
1/4 cup elderflower syrup
3 tbsp light, fruity extra virgin olive oil
1 lime zest & 1/2 of it's juice
1/2 tsp real vanilla extract
Pinch of pink sea salt
Pinch of fresh long black pepper ground
2 scrapes fresh nutmeg

Method:

-Prepare your peaches by scoring an X in the base, then dipping in a pot of boiling water for 30 seconds. Plunge the drained peaches, quickly into an ice bath. See below for picture details. Slice and chop the peaches as shown. Place in a non-reactive bowl.

-Peel your knob of fresh ginger and grate it finely using a microplane zester, keep aside or do the grating at the last minute after zesting the lime.

-Grab your cucumber. Peel, remove seeds, cut in four, then dice the cucumber. Pics show all, down below. Add to bowl with peaches.

-Take small piece of red pepper, slice and chop into small pieces then add to bowl.

-Take scallion (green spring onion) and slice thinly on a diagonal to get a nice look to your slices. put in bowl with peaches.

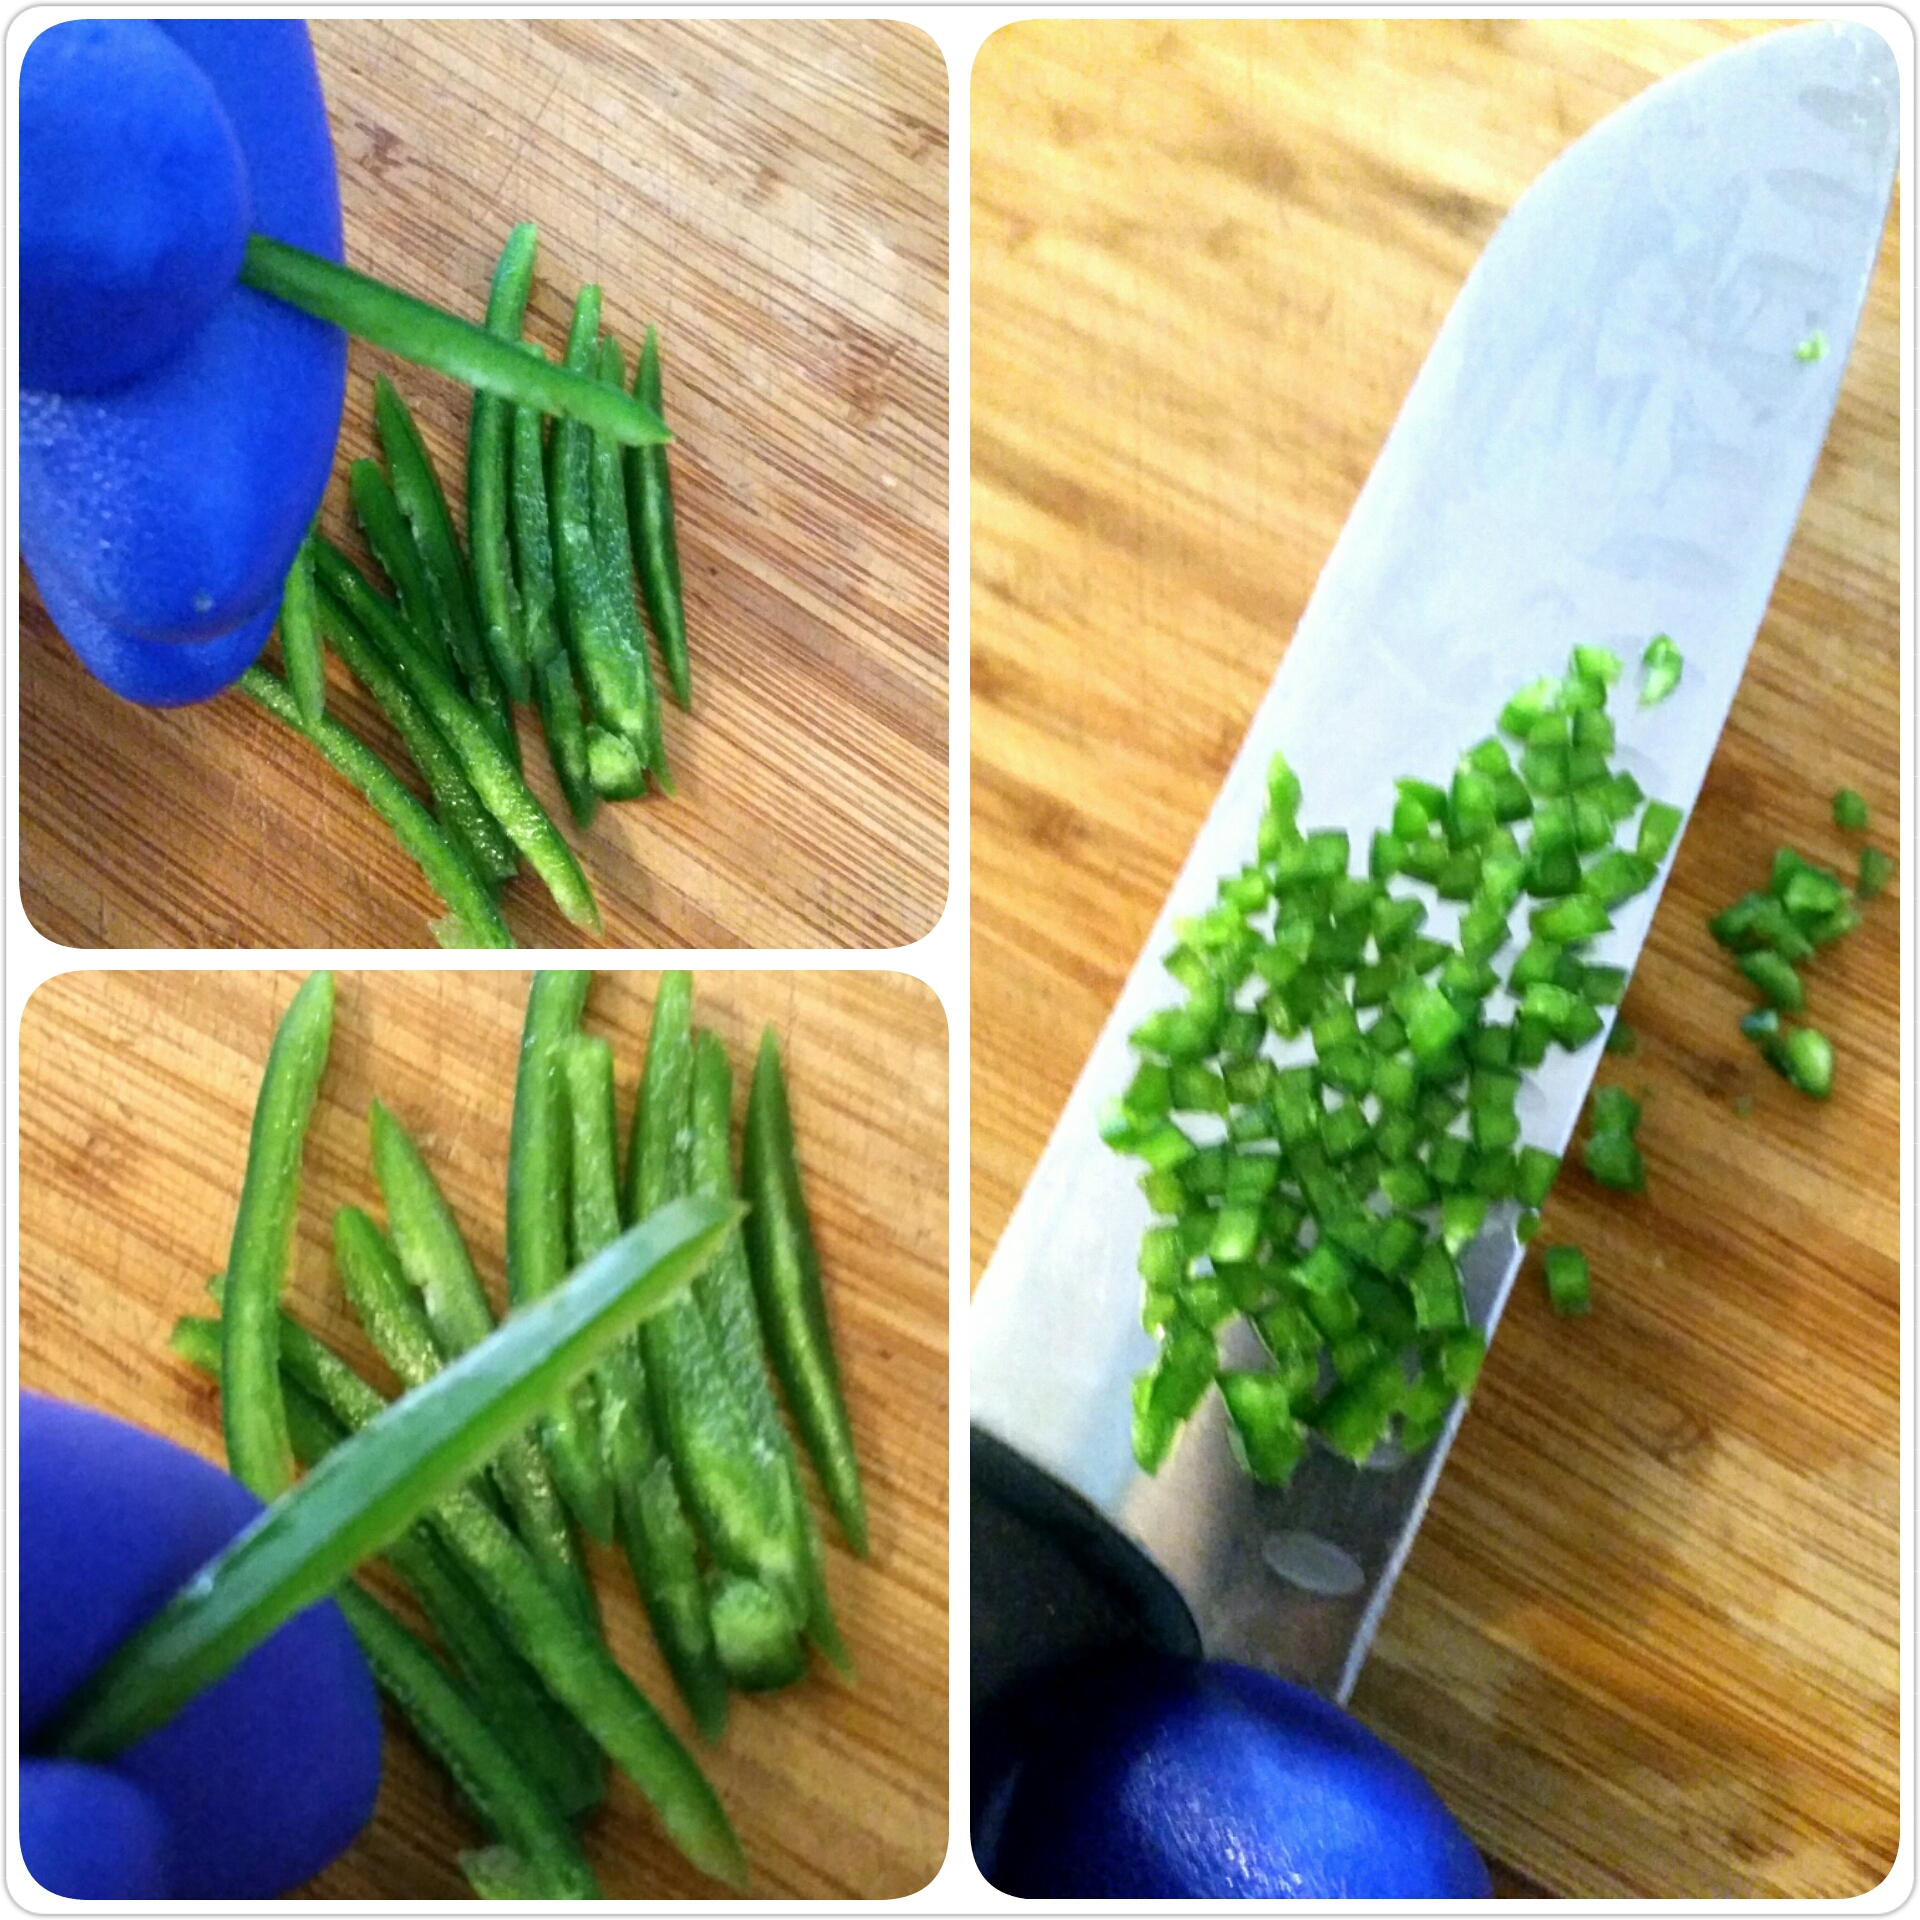
-WEAR GLOVES!!!!!!! Do not touch your eyes or any delicate mucous membranes when handling hot peppers. Prepare the jalapeno, slice in half, remove guts and slice, then chop very small. See pics down below.

-Roll your lime, zest the green skin, about 3/4 of it over peaches, add ginger and elderflower, vanilla, and then olive oil.

-Add nutmeg.

-Add salt and pepper, to taste.

-Gently, with a spatula, mix all ingredients. Chill in fridge (covered) for 20 minutes before serving.

Makes 4 servings
Lasts 1-2 days in fridge, not suitable for freezing.


Peaches! Millions of peaches, peaches for me, millions of peaches, peaches for free! Anybody else remember that song?  Focus Kiki, focus.
So, here you see the simple method of scoring an X on the bum of the peach-not too deeply, then dunking peaches in boiling water for 30 seconds. You quickly move them to an ice bath, (cold water with ice cubes, this stops the cooking process and makes peach skin peeling possible). This method can be used for tomatoes, nectarines, etc.


See how easily the skin comes off?

Slice and chop just like in the pictures. Be gentle, these are delicate fruits.


Now peel the ginger, you keep it aside until you zest the lime skin in, then you add the ginger you grated with the same zester, (keep the ginger to a fine grate, no chunks).


Mr. English cucumber, like all cumbers, has a flaw. The seeds are very hard to digest. It's all that cellulose that keeps it coming back to talk to you all day and night after you have eaten it. My mother, clever lady that she is, showed me this neat trick. You cut it in half, gently scrape out the seeds with a small spoon-chuck those out, and voila! You are back to eating cucumbers again without the torture. I slice those halves in four and chop small for this recipe. See pic below.
After cucumbers comes the very small piece of red pepper. Honestly, this is for a pop of colour, just keep the dice small.


You only want the white tips of the scallion for this, keep the green's for another recipe like this delicious one I thoughtfully put a link to for you (I know, I am such a giver):
http://thekinkycoconut.blogspot.ca/2013/02/my-mom-modified-shrimp-dip-awesome-with.html

My impersonation of the Blue Man Group follows in this next pic. Heheh, actually, I have serious reactions to acidic and spicy foods-my eczema flares badly, even with regular gloves. These heavy duty blue bad boys are my solution when handling any kind of peppers.

Carefully remove the ribs and seeds, you want a mild heat that is present but almost imperceptible.

Chop finely by slicing into small, thin slivers. That is what will give you a tiny dice.

 Roll all limes (or lemons) before using. This loosens and releases the juice.
When zesting limes (or lemons) NEVER zest past the skin where you have colour. The white stuff is called pithe, it is bitter and not appetizing. The colour part of the skin, green for the lime, is where the bright burst of flavour oils are hiding. That is what we want in a recipe.


Ginger can be strong and quickly overpowers a dish, especially since we are using Elderflower, we want to be more conservative when using it. I adore fresh ginger, so I rarely recommend using the powdered and ground stuff, unless required for baking. Trust me, the fresh ginger goes all the way to flavour town!


Elderflower, this is such a fun and exciting ingredient in my pantry. I am doing a happy dance and song as I open this for the first time. Christening it with this peach flavour combo is going to be amaze bombs! It's very clear, smells so inviting, and if you like, feel free to use it for beverages and ice pops. Ooh, new recipe idea! Yipee! Hooray for elderflowers! Thank you Abba for blessing us with so many wonderful things to create meals with.

I used this new organic EVOO, I wanted to try out a new olive oil, this one we got at Costco. Normally, I would recommend a much more expensive brand I get from this sweet little shop at Atwater Market, however, I have not been there yet this summer and I am on a tight budget. This one is mild, not sharp, and worked well with this recipe. If you use a heavier, less fruity, darker evoo, you will loose the delicate taste of elderflower and may as well just pour it down the drain. You WANT to taste the elderflower, lingering in the background, so trust me, use a very light evoo.
EVOO= extra virgin olive oil.

This was the end product, I had some haddock, asparagus, and jalapeno cheddar, scallion, potato cakes to go with. Scrumdidilyumptious and devoured!
Be brave, fearless, and filled with joy, I want you to get out there and try this recipe, do it with gusto, then tell me all about it. Comments or questions down below and do not forget to subscribe.


Friday, May 15, 2015

Marinated Asian Cucumbers


Helloodles everybody!
I have been running errands and doing a multitude of things which have kept me rather busy the last few days. I wanted to post a recipe for something super easy, not long to make, and taste bud delightful.
I make these marinated Asian pickles when ever I want to brighten up a meal or am craving something pickled that tastes a bit different from the usual store bought dills.
I make a huge portion because my family zips through these so fast, I wouldn't get any if I didn't. The recipe calls for a much smaller portion which is perfect for a mason jar, not the small jam size but more the medium pickling size. We have these big glass jars left over from the pickles my mom loves that are very briny-yuck to me but one person's candy is another person's poison. Anywhoodles, I always ask her to save me the jars and she does so I get to re-purpose them for loads of D.I.Y projects and recipes. I know you will like these, they don't last as long as typical pickles but that's not such a bad thing, I find they taste best the first 48 hours; ours are eaten up within 3 days so I can't really tell you how long they would last but I would suggest up to 5-7 days max. Here you go...

MARINATED ASIAN PICKLES:

Ingredients:
-1 pkg Slim baby cucumbers(8-10 small), cut up on different angles to give a bit of a funky shape, leave the skins on them.
-2/3 Cup Rice vinegar
-1/4 Gluten-free Tamari sauce or Coconut aminos
-1 -3 Tbsp Fish seasoning (this is optional, add more Tamari if you omit but I like the extra sour tang it adds)
-1/4 Cup Organic Coconut sugar aka palm sugar, you can use more depending on how sweet/sour you like your pickles to be. Just taste your pickling mix after all is made and add what you want a stronger or milder taste of taste of before throwing in the pickles.
-1/4 Cup hot water (You can add more if it's too vinegary. Rice vinegar strength varies from brand to brand, so sometimes more water is needed and sometimes less)
-1 tsp Kosher salt
-1 Tbsp Black sesame seeds

Method:
-Add all ingredients, except the cucumber, in the jar (ignore the sesame oil in the pic below, he was lonely and snuck in to hang with his friends). Shake well, taste and adjust the seasonings to your preference but only 1 tsp to 1 Tbsp at a time of each ingredient. Salt starts with way less because you can add but you cannot take away. If you find it's not vinegary enough add another Tbsp.
-Some people like their pickles sweet, vinegary, with a bit of heat. Feel free to ass 1 tsp hot chili sauce if you like.
-Once the seasoning is to your taste, add the pickles, tightly screw the cover, shake it up, then refrigerate overnight; making sure to shake it every 2 hours for the first 6 hours.
-Serve them as a side dish to fish, meat, vegetarian dishes, even add them to a regular salad or eat a few just like that but be warned, they are addictive!

I know this recipe is a bit, add a dash here, a touch there, but the truth is that pickles are a personal thing. I can't stand bread and butter pickles because I prefer a sour tang pickle but one of my friends just adores them and can polish off a whole jar-whoa la!!
I like dill, sour, and crispy snap, my mom prefers brine and garlicky, my son likes dill, garlic and hot peppers, my man likes what ever you give him because he is wonderfully non fussy. I say, PLAY!
I think that's what I enjoy the most about this recipe, the flavours are different and can be tailored, but the real kicker is adding that soy and rice vinegar which couples beautifully with the black sesame.


I ate mine on a salad and they tasted so good, we also served them with some black rice noodles I found but I will post a recipe with those another day. Remember to share with those you love, leave your comments below and don't forget to subscribe!


Tuesday, February 12, 2013

My Mom's Modified Shrimp Dip-awesome with a cape!

This simple recipe is always a fav. at get together's and has become one my mother gets asked to make repeatedly. It does not last, so if you want extra be prepared to double & triple this recipe because you will end up with an empty bowl.
This recipe uses Pacific white shrimp which from what I have researched is a sustainable seafood, for now. If you should find out differently then please let me know, I like the corrections just be kind about it.

Shrimp Dip Recipe:

Ingredients

-300g (About 31-40 individual shrimps)Extra large Pacific white shrimp, deveined, cooked, and peeled.
-1 Red pepper medium small dice
-1 Green or yellow pepper medium small dice
-1 Small bunch of scallion (4-6 stalks)
sliced thin with the white parts and green.
-1 Bunch curly parsley chopped to equal 1/2 of a cup.
-1 Tbsp Lemon zest freshly zested
-1 tsp Black pepper freshly ground
-1-2 tsp Sea salt
-1-2 1/2 Tbsp Curry powder (this depends on your curry strength preference, I like it a lot)
-2-3 Tbps Home made mayo (Can use Hellman's)
-1/4 Cup Plain yogurt

Method:
- When all veg and shrimp ingredients are measured and prepped, toss them all together in the bowl and mix well.

-Add spices and stir through, it will look kind of like shrimp tabbouleh.

-Add mayo and yogurt and stir through. Let sit in fridge covered for 2-3 hours and serve on crackers. I used sesame rice crackers.

I have included pics below because it is easier to visually see the way to cut, chop, zest, etc. The pictures are in order and show how to get the sizes of what you want for this recipe without fuss.
The peppers are to be cut in strips as shown to achieve the proper dice.
There is also a Chef trick used for parsley, once it has been thoroughly cleaned in cold running water,(make sure no dirt or sand remain or else it will leave grit in your food) Chefs bunch the parsley all together in a wad and leave a bit exposed as they chop it, being careful of fingers and hands. Then they put it on the cutting board and chop back and forth until it's finely chopped. Do not hold your finger on top of the blade as you see in the pic when chopping, ever! I was taking pics one handed and had no choice but to hold it that way. When I can wrangle up some other hands for pics I will have a proper methods section added to this blog. In time my lovelies, I promise in time.
When zesting, I use a microplane zested but a box zester will do. Just be sure to zest only the yellow skin not the whit part known as the pith, it's bitter and not appealing. Only the yellow lemon skin part.
I also happened to of bought shrimps that had the tails on and I know for some people this can be intimidating. Once you have defrosted them, just peel the end of the tail slowly, beginning where there's a natural indentation in the tail shell. When sufficiently peeled you then pinch the tail off by holding the shrimp with one hand as you peel or by laying it flat on a cutting board and holding with one hand as you pinch and pull away from the shrimp.

You will notice this recipe uses home made mayo, I no longer purchase it because it doesn't taste good to me and I don't like food with ingredients I can't pronounce or with artificial muck. This recipe will follow in another post, I forgot to measure and take pics while I made it for this recipe so when I am out of mayo I will make more and post.
In the mayo pics I switch to a plastic spoon for measuring, the reason for this is because a non reactive spoon like plastic or wood will not impart flavour to the mayo and do not cause it to spoil as quickly.
The pictures below are in order, I hope you enjoy this recipe and as always it's gluten free!