Translate

Showing posts with label Desserts. Show all posts

Wednesday, December 9, 2015

GF Chocolate Cream Pie with Snickerdoodle Crust & Snickerdoodle Cookie Recipe


This is a pie that is simply divine, a classic with a Christmas twist. I did not have any gluten-free graham crackers or crumbs hanging around but I had GF Snickerdoodle cookie dough in the freezer. I decided to bake them, crumble them up, mix in some butter and use them as a crust base. I am including the snickerdoodle cookie recipe as well, with the gluten-free flour mix.
The recipe for the pudding was originally from Martha Stewart, however, I made some changes. I changed the refined sugars, the kind of milk I used, and the starch. I also made some additions to lighten up the pie because I like chocolate pudding pie but cream pie's take me back to me childhood, when my parents would bring home one of those frozen cream pies as a surprise dessert. I liked how light and creamy the fillings were, the yummy graham crust, and the whipped toppings were silky fun! I cannot eat them anymore because of my allergies and the last time I ate one they had become pale imitations of their former incarnations, from my youth.
This pie is a big treat, the chocolate is unctuous without being heavy, it's not overly sweet, and that cinnamon snickerdoodle crust delights your tongue at the end.
Leave your kitchen adventure comments down below, I love to hear all about how things turn out for you.

SNICKERDOODLE COOKIES:

Difficulty: Low            
Cost Range: Low
Time: Prep-60 mins (includes chill time)  Bake-10-15mins
Yields: 30-36 Cookies depending on size you make them
Freeze: Beautifully, last 1-3 months

Preheat Oven to 375° F

Ingredients:
1Cup Butter, unsalted and softened
1/2 Cup Shortening
1 1/3 Cup Sugar
1/2 tsp Cream of tartar
1/4 tsp Sea salt
1 1/2 tsp Xanthan gum
1 1/2 tsp Real Vanilla extract
3 Cups #1.5 G.F Flour mix (mix recipe follows after this recipe)

3 Eggs

For rolling cookies: 1/2 Cup sugar, 2 tsp ground cinnamon

For pie crust: 11-15 Baked and cooled cookies, 1/4 Cup melted unsalted butter


Method:  

-In a standing mixer with paddle attachment or using a small hand mixer, in the bowl beat butter for about 1 minute.

-Add sugar and salt, beat for about 2 minutes until light and fluffy.

-Add eggs and beat.

-And add the vanilla, beat for 1 minute until well combined.

-Gradually add flour mixture on a low setting so flour does not go flying everywhere, beat until well mixed.

-Cover and chill dough for 1/2 hour until firm but not rock hard. If you over chill it, just let it sit on the counter for a bit until it softens to a firm state. (Don't panic)

-Shape dough into 1 inch balls, I like to use a scooper I bought that is the perfect size and then give them a slight roll into perfectly shaped ballzinies!

-Roll each ball into the sugar cinnamon mix.

-Place on cookie sheet that has been prepped with parchment paper-not greased! You don't need to grease anything when you use parchment paper and remember you can reuse parchment paper sheets several times. I lay out the cookies 3 down and 4 across because they do spread, on a slightly larger tray I will do 5 across. Press them down slightly.

-Bake in  preheated oven for 10-15 minutes. I bake for 7 minutes and turn the tray around halfway then bake the last 5-8 minutes. This is to ensure even baking and colour, I find this helps a lot with gluten-free baking.

-The cookies should be slightly pale, a golden brown on the bottom. Allow to cool on the tray for 3-4 minutes before transferring to a cooling rack.

-Preheat oven to 350 °F

-Once they have cooled completely, you will need to use 11-15 cookies for the crust, depending on the size of your pie plate. Crumble them up and pulse in a processor quickly, to give a nice crust crumb.

-Place crumbs in a bowl, to this add the 1/2 tsp of cinnamon and mix. Then add the melted 1/4 Cup of butter and mix together.

-Press evenly into a 9" pie plate. Bake for 10 minutes and remove from oven, allow to cool.


GlUTEN-FREE FLOUR MIX #1.5 RECIPE


(Makes 3 Cups)

1 1/2 Cups White Rice Flour (fine ground but not sweet white rice flour, it's too fine for this recipe)
1/2 Cup Brown Rice Flour (fine ground, not gritty big grainy)
1/3 Cup Tapioca Starch
2/3 Cup Potato Starch (not potato flour)

Method:

-In a bowl, very carefully measure and blend all ingredients together.
So, this a base recipe for many cookies. I need to let you know that if you do not take extra care in how you measure these ingredients out, it will spell disaster for your recipes. They will taste floury, have a weird silky mouth feel if the wrong flours are used or if too much of a starch is used by accident and will crumble to crummy sadness. Nothing is worse than doing several batches of cookies with horrible results because you can't figure out that the base flour recipe is to blame, before it's too late. Trust me, the extra care you take will show in the wonderful positive results you baked.


GF CHOCOLATE CREAM PIE WITH SNICKERDOODLE CRUST
Difficulty: Low            
Cost Range: Low-Medium
Time: Prep-60 mins (includes chill time for pudding), pie total time, 4-5 hours
Yields: 1x a 9" pie
Freeze: Not suitable
I have given the alternatives for dairy products and have included a vegan snickerdoodle recipe from a vegan blog, in case you do not tolerate dairy. The vegan snickerdoodle cookie recipe comes from
mycaliforniaroots.com site. If you have a recipe you prefer, then by all means do so.
                                                   Vegan Snickerdoodles | mycaliforniaroots.com | #cookies #recipe #vegan
http://mycaliforniaroots.com/vegan-snickerdoodles/

Chocolate Cream Filling Ingredients:

3 Tbsp Earth balance vegan margarine or Butter, unsalted and softened. (I use butter)
2 1/2 Cup Milk (I used unsweetened Almond Milk because I do not tolerate milk but butter is fine for me. Do what works for you.)
2/3 Cup Organic coconut sugar
1/4 Cup Maple syrup
1/3 Cup Cornstarch, I used Arrowroot starch -mix with 2 Tbsp of water. (I use arrowroot because I have a corn allergy)
1/4 tsp Sea salt
1/3 Cup Sifted cocoa powder
1 1/2 tsp Real Vanilla extract
4 Egg yolks

(Make the whipped topping of choice when the pudding has cooled, then continue to the final part of the pie recipe)
Whipped cream topping:
250ml Lactose-free whipping cream mixed with 1/2 Cup sifted powdered sugar
Method:
-Whip until stiff peaks form.

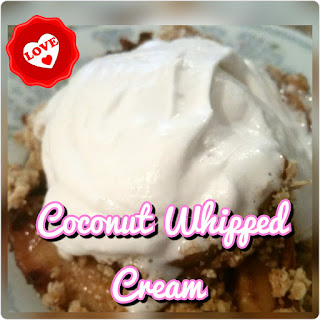
If you do not tolerate dairy, use this coconut whipped cream recipe in it's place:
http://thekinkycoconut.blogspot.ca/2015/07/vegan-coconut-whipped-cream.html
 

Method:  

-In a bowl whisk eggs, sugar, vanilla, salt, cocoa powder, and milk.

-Place in a non-reactive, heavy bottomed sauce pan. Use a whisk and heat mixture on a medium heat for 3-4 minutes until simmering, add starch mixture and whisk a lot for 1 full minute and a half. Be very careful because this mixture can burn easily. Remove from heat immediately.

-Continue to stir and add butter by whisking in.

-Quickly pour into a bowl, and cover the pudding directly touching the plastic wrap.

-Chill for at least 2-3 hours until completely cold.

-In a clean bowl, take half the pudding* and add 1/2 a Cup of the whipped topping, fold in gently until well incorporated.

-Pour into cooled pie crust, then using a twist or star tip piping tip fitted piping bag, fill the rest of the whipped cream in and pipe the topping. There are pictures down below. You can grate chocolate on top or sprinkle holiday decorations on top. I like to keep mine simple.

-The pie needs to be chilled for another hour but I place either a round or squares of wax papers to protect the whipped topping from forming a dry film.

-Slice and serve, don't forget to share with someone you love.

*The pudding recipe doubles, feel free to make a second crust, and double the whipped topping you make. This way you can make two pies, give one as a gift or serve two at a party.

The pie lasts 5 days in the fridge.


Wednesday, September 9, 2015

Rawfood Vegan Maple Pecan Pie Bars from Crudessence


Morning beautiful people, it's time for the dessert recipe that I tried from the wonderful Crudessence cookbook, which I reviewed recently. Did I ever mention how much I freaking love pecan pie? Poppa Bear says like but nuh uh, this is a sexy pecan love affair. Don't worry PB, you are still #1 in MB's heart, pass that slice of pecan pie would yah? Pleeeeeease.
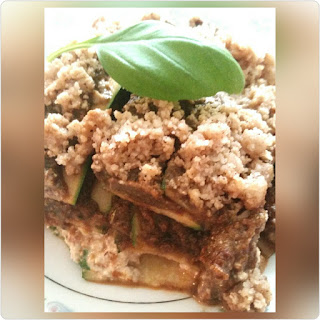
BTW-the review and link is lower down after the lasagna picture. It's a good one, you should really check it out. This is what the Crudessence cookbook looks like:


Here is the link to the recipe for that lovely raw vegan lasagna:
http://thekinkycoconut.blogspot.ca/2015/09/crudessence-raw-vegan-lasagna-recipe.html

So, I made these maple pecan pie bars a little while back and I adjusted the recipe which did not use raw cashews but only raw Brazil nuts. As that would have made this dessert way too expensive, I chose to use half raw cashews and found that it was good because it lightened up the richness considerably. I also turned the pie into bars and left out the 1/4 tsp ground cardomom that was supposed to go in the crust as I had a bad reaction to cardamom a little while ago.
This item used to be on the Crudessence menu at their resto years ago and at healthfood stores, but sadly, it went the way of the dino. I was so so sad when I found out the terrible news, nothing has ever replaced it. I was a bit dismayed every time I went to purchase it, they had to reminded me that it was no more. Waaaaah...
I really enjoyed eating it as I am such a pecan pie fan. At the time I was a serious raw foodie so it was a joy to have a treat which was an amaze bombs stand in for the cooked, and let's face it, rather unhealthy version. I was over the moon when I found it in the dessert section of the Crudessence cookbook, which is really the best part of any cookbook, in my humble opinion.
Ladies and gents, I give you, the pecan goodness that must be devoured with wild abandon and a good cup of tea. Enjoy!

CRUDESSENCE RAWFOOD VEGAN MAPLE PECAN PIE BARS

Ingredients:
1 Coconut Pecan Crust Recipe, pressed into an 8" pie plate or a square brownie pan(recipe follows down below)
1 C Brazil nuts soaked
1 C Cashew nuts soaked
3/4 C Date paste (recipe link follows down below)
1 tsp Vanilla extract
1/3 C Melted coconut oil
3 Tbsp Maple syrup
*1/4 C Filtered water (add only if needed when blending if too thick)
12 Pecan halves (to decorate the top)

Method:
-In a blender blend nuts, water, vanilla, maple,water and date paste until smooth.
-Add coconut oil, blend for 5 seconds.
-Pour into prepared pie crust, place pecans on top evenly.
-Chill for 4 hours or overnight.
-Slice into pie slices or bars depending on type of pan you use, I used a square pan and sliced them all in advance then froze them to eat later as I wanted.
-Serve with a dollop of maple syrup.

Date Paste:
http://thekinkycoconut.blogspot.ca/2015/08/date-paste-rawfood.html

COCONUT PECAN CRUST
Ingredients:
1 1/2 C Pecans
3/4 C Unsweetened shredded coconut
3 Dates soaked no pits
1/4 tsp ground ginger
1 tsp ground cinnamon
1/4 tsp fresh scraped nutmeg
1/4 tsp ground clove
1/8 tsp pink sea salt

Method:
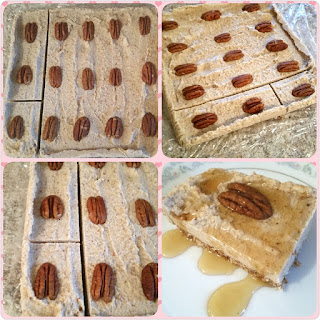
-Grind nuts in blender with pecans for 60 seconds, add coconut and blend until they are a medium ground flour consistency, it's okay if it's not completely smooth. I like a small bit of mini chunkage. Try not to over grind.See the pics below for consistency, visual help.
-In a bowl add spices to those ingredients and mix well, you may add 1 tbsp coconut oil if mixture is too dry but I never had this problem,.
-Press into a pie plate or a square brownie pan evenly, I chill it for 30 minutes before pouring the crust in. Also, if you want it to be easier to take out the bars I lay down parchment paper or plastic wrap, which I allow to hang way over the edges to ease pan removal for cutting.
This made 16 bars and everybody was really diggin' on em'. Some people added way more maple syrup at serving time, this is a personal preference and health thing.
They froze beautifully, I recommend a month maximum and wrap them well as nuts pick up flavours of other foods in fridge and freezer.
I hope you try this recipe out, you will not be sad you did because they are amazing! Go for it and let me know all about your kitchen adventures, I love to hear from you.


Thursday, August 27, 2015

Lemon Chiffon Tarts (Rawfood, Vegan)

It is time we had some citrusy fun lovelies!
I was playing around with some Rawfood ingredients and had a bunch of lemons, thus the idea for these pretty pucker punch, (say that 3 times fast!) delights. I will say, I am more of a lime person, however, I have been known to scarf down slices of lemon meringue and lemon chiffon pie when the occasion calls for it. I am a lemon pie purist, real lemon curd is a must in my life. If you are looking for a serious sour/sweet and totes deelish lemon curd recipe, click here:

The curd has eggs and dairy but this lemon chiffon tart recipe is vegan, Rawfood, and a smack to all the right taste buds. You gonna like it! Mwuah hahahaha
It's actually very much an icebox style lemon chiffon pie recipe.
If you have never heard of lemon chiffon, sit back and allow me to drop some fluffy citrus knowledge on ya'll.
Lemon meringue pie is known for it's tart, citrus, lemony filling, which is piled with pretty beaten sugared egg whites called meringue. For lemon chiffon pie, the meringue gets folded into the filling and then poured into the crust, and boom! You have tasty magic. Cue oohing and awwing...
Every bite is a light, airy, sunshine-filled joy. 
Now, how can one possibly go about recreating fluffy goodness in a Rawfood, vegan,(meaning egg-free) version?
It was actually really easy and did not take too long either, (minus the soaking of nuts) which is always a bonus in my neck of the kitchen adventures. 
I also like that it's healthy, chock full of good fats, and a nice cool treat. Perfect for hot summer days. Here you go pretties, I hope you have fun with it, like I did. As always, pics follow to guide you and help with the drool factor, good times.

LEMON CHIFFON TARTS (RAWFOOD, VEGAN):

Ingredients:
Filling-
1 recipe Vegan, coconut whipped cream. Prepare when the recipe says to. (Click the link to get it)

1 1/2 C Soaked 4 hours, and rinsed raw cashews
1/4 C soaked 2 hours, and rinsed raw macadamia nuts
2 Tbsp Soaked 1 hour. and rinsed raw pine nuts
Juice of 5 Lemons (3/4 C)
Zest of 2 Lemons
1 Tbsp EVOO organic (extra virgin olive oil)
2 Tbsp Melted Organic raw coconut oil
1/2 tsp Walnut oil, cold pressed
2 tsp Vanilla extract
3/4-1 C Grade B maple syrup (depends on how sweet or tart you prefer, adjust to taste)
3/4 C Filtered water
1/2 tsp Pink sea salt

Crust-
2 C Almond meal
14 C Tiger nuts (roar)
1/2 C Small coconut shred, unsweetened
1/2 tsp Pink sea salt
1/4 C Grade B maple syrup
1 tsp EVOO, organic
1/4 tsp Walnut oil, cold pressed 
1 Vanilla bean, seeds scraped

Method:
Crust-
-Mix all dry ingredients
-Add wet to dry and combine
-Using a muffin pan that holds 12 muffins, rub a very small amount of coconut oil in the bottom and on sides of muffin cups.
-Gently press the crust evenly into each round, about 2-3 Tbsp each one.
-Keep aside.

Filling-
-Place all ingredients except oils and whipped coconut into a blender, blend until smooth. Add a bit of water if necessary but not too much because oils still have to be added in.
-Add oils to mixture and blend well. Should have a very smooth, creamy, and thick consistency. You do not want a watery liquid.
-Chill for 30 minutes in fridge.
-Prepare and whip the coconut cream 10 minutes before filling has been in fridge for 30 mins, keep aside. 
-Remove lemon filling from fridge, stir through once.
-VERY gently, fold in whipped coconut cream.
-When well incorporated, portion out the filling between the twelve cups. The filling will be runny and rather liquidy, this is fine.
-Place the pan in the freezer and freeze 8-12 hours or overnight.
-To remove from container, take out of freezer and place on counter for 5-10 minutes. Not too long because this pie melts. It is meant to be eaten very cold, think of it as an icebox pie.
-Using a knife heated under hot water and dried, run along edges and gently pop them out of the trays. I leave the tarts on plates for about 5-10 minutes and they are perfect for serving.  

This recipe makes enough for 12, if you have leftover, put it in mini mason jars, chill and enjoy as a soft pudding.

I am so looking forward to hearing about your experiences with this delightful, raw vegan, icebox pie. Leave your comments or questions down below, and don't forget to subscribe!


Monday, July 27, 2015

Vanilla Bean Cherry Chia Pudding rawfood


Oh boy! Do I like this recipe, I mean, I liiiiiiiike it! It's so close to tapioca without the reactions and it tastes even more fresh and creamy thanks to the homemade vanilla bean almond milk, a recipe you need, to make this properly; which I linked twice down below.
And no, you cannot substitute if you want the same results that I got. Trust me, it's worth the effort.
I used dark cherries because they are in season, are one of my all time favourite fruits, they meld well with vanilla and almonds, as well as helping to fight inflammation. Winning!
Plus, it's cherries, nothing else needs to be said. If for some sad reason they are not your thing, (For shame, but I forgive you) here are perfect subs:
Strawberries
Blueberries
Mango
Lychee
Apples
Banana
Nectarines
Peaches
Blackberries
Raspberries

If you use banana, add it just before serving so they stay pretty.

Without further ado, here is the delightful recipe.

Vanilla Bean Cherry Chia Pudding

Ingredients:

1/4 Cup White Chia seed
1 1/2 Cups Vanilla bean almond milk, (Link for recipe follows down below before method) use cheesecloth if you don't have a nut-milk bag.
1-2 Tbsp Maple syrup
1/8 tsp Pink sea salt
1/2 Real Vanilla Bean scraped (Step by step how to, with pics is explained in the almond milk recipe which is linked down below).
10-15 Black cherries halved & pit removed, or fruit of your choice.

http://thekinkycoconut.blogspot.ca/2015/07/vanilla-bean-almond-milk-rawfood.html

Method:

-In a bowl add all ingredients and stir then whisk until well combined.
-Pour into container with sealed lid, refrigerate for 30 minutes, stir or shake container once or twice while refrigerating.
-Serve in beautiful bowls topped with a mint leaf, (Once chilled to your preferred temperature. I like mine very cold.)

Remember to share with a loved one. Leave comments or questions down below, I love to hear from you.


http://thekinkycoconut.blogspot.ca/2015/07/vanilla-bean-almond-milk-rawfood.html


Enjoy the fruits of your labours! Pun intended.

Sunday, July 5, 2015

Vegan Coconut Whipped Cream


Helloodles lovelies!
I am sharing this amaze bombs recipe that answers my whipping cream daydreams. How I missed you strawberry shortcake...
Yup, it can be pretty tough for us dairy allergy sufferers and for the Veganites out in the land of dairy filled treats, but fear not, this is a scrumdidilyumptous replacement that is ridonkulously easy and has a marvelously short ingredients list. Just remember to keep things well chilled and to use coconut MILK not coconut cream, then all will turn out ripe peaches. (Topped with coconut whipped cream of course, mwuah hahahaha!

VEGAN COCONUT WHIPPED CREAM

Ingredients:
1 Can 398 ml of coconut milk, shaken and chilled in freezer for 1 hour
2 Tbsp Maple syrup (feel free to add a bit more but I prefer less sweet)
1/2 tsp Vanilla essence

Method:
-5 minutes before your hour of chilling your can of coconut milk in the freezer is up,(use a timer to chill it or you will forget it's in there, trust me I know from experience) place a medium size bowl and beaters from a hand mixer in the freezer, for said last 5 minutes.

-Working quickly because keeping all cold is super important for success, open can and pour contents in chilled bowl. Leave the beaters in the freezer until you are ready to whip, then put them in hand mixer.

-Quickly add maple syrup and vanilla essence, stir.

-Using hand mixer with chilled beaters, whip for 4-5 minutes until stiff peaks form and the cream holds it's shape.

-Serve over your favourite desserts or treats and enjoy!

-Makes about 2 cups, cover and chill the remaining amount. Lasts 3-4 days in fridge but mine disappears after 2 days, so good luck with that.

Remember to share with a loved one, don't forget to subscribe, and leave those loverly comments below if you try out this recipe cuz I do like to hear from you.


I actually made this recipe to smother my vegan apple crisp that I have been craving ever since I bought a bag of apples the other day. I will post the recipe for that bad boy but not aujourd'hui.
Bonne appetit!

Friday, May 1, 2015

Gluten-free Raw Vegan Blueberry Bon-Bons

The recipe follows after all the info, if that's what you came for, scroll down to the picture. The recipe is just below it.
Warmer weather is on the way and that means goodbye winter weight, hello healthy clean eating choices. I need snacks, quick, grab and go yum yums for the munching moments that come up. The problem is that all too often they are so sticky sweet that it hurts my teeth and gives me headaches. I have a sweet tooth but it seems that the level of sweet I like differs greatly from the average sugar monster. I gave up on "health" bars a long time ago and decided to make my own with way less sugar, a fraction of the cost, and ingredients that I could pronounce.
I don't use agave, you may feel free to use it as a maple syrup relpacement but a lot of information has come out on agave and after I researched and listened to how negatively my body responded to it, I gave it up. I don't miss it, I know it's big in the raw vegan world, which was where I first discovered it years ago, but it's not a healthy sugar or corn syrup alternative. As a matter of fact, it's not even raw. It goes through a serious process to come out like how we are used to seeing it and with a taste we like. In it's truly raw state, agave is very thick, almost black, and super bitter. That kind of agave has some medicinalproperties but is used sparingly. In our North American way, we have denatured a product to suit our sweet tooth needs and have hoped for the best until we find out the worst. I was just as guilty of this as any other, I firmly believed that Agave nectar was raw and had a lower glycemic index than sugar, blah blah blah. New studies have actually come to find that it's just as bad if not worse than corn syrup because it's more quickly absorbed than corn syrup and has been processed to a point where it has no health benefits what-so-ever.
Here is a small excerpt from an article at the huffington post, the link follows underneath if you want to read more. And before all the haters start firing off, for the sake of balance, I have included a write up from another health site that says why Agave is not as bad as high fructose corn syrup. I give you the information, take what you like and leave the rest. All I know from my personal experience is that my body started reacting very negatively to Agave in a very short period of time and I never looked back. I don't want to have my stomach swelling, making horrible sounds, severe nausea and then itchy skin to be a part of my treat routine.

What is the "Real" Truth about Agave?
If you knew the truth about what's really in it, you'd be dumping it down the drain and that wouldcertainly be bad for sales.
Most agave "nectar" or agave "syrup" is nothing more than a laboratory-generated super-condensed fructose syrup, devoid of virtually all nutrient value, and offering you metabolic misfortune in its place.
Unfortunately, masterful marketing has resulted in the astronomical popularity of agave syrup among people who believe they are doing their health a favor by avoiding refined sugars like high fructose corn syrup, and dangerous artificial sweeteners.
And if you're diabetic, you've been especially targeted and told this is simply the best thing for you since locally grown organic lettuce, that it's "diabetic friendly," has a "low glycemic index" and doesn't spike your blood sugar.
While agave syrup does have a low-glycemic index, so does antifreeze -- that doesn't mean it's good for you.
Most agave syrup has a higher fructose content than any commercial sweetener ranging from 55 to 97 percent, depending on the brand, which is FAR HIGHER than high fructose corn syrup (HFCS), which averages 55 percent.
This makes agave actually WORSE than HFCS.
It is important to understand that fructose does not increase insulin levels, which is not necessarily good as what it does do is radically increase insulin resistance, which is FAR more dangerous. You see, it's okay for your insulin levels to rise, that is normal. You just don't want these insulin levels to remain elevated, which is what insulin resistance causes.
That is why fasting insulin is such a powerful test, as it is a very powerful reflection of your insulin resistance.
In addition to insulin resistance, your risk of liver damage increases, along with triglycerides and a whole host of other health problems, as discussed in this CBC News video about the newly discovered dangers of high fructose corn syrup. The study discussed in this news report is about HFCS, however, it's well worth remembering that agave contains MORE fructose than HFCS, and in all likelihood, it's the FRUCTOSE that is causing these severe liver problems.
How Agave is Grown and Produced Proves it is Unnatural
Agaves grow primarily in Mexico, but you can also find them in the southern and western United States, as well as in South America. Agaves are not cacti, but succulents of the yucca family, more closely related to amaryllis and other lilies. Edible parts of the agave are the flowers, leaves, stalks and the sap.
A mature agave is 7 to 12 feet in diameter with leaves that are 5 to 8 feet tall -- an impressive plant in stature, to be sure. There are over 100 species of agave, in a wide variety of sizes and colors.
Although the industry wants you to believe that agave nectar runs straight from the plant and into your jar, nothing could not be farther from the truth.
In spite of manufacturer's claims, most agave "nectar" is not made from the sap of the yucca or agave plant but from its pineapple-like root bulb. The root has a complex carbohydrate called inulin, which is made up of fructose molecules.
The process which many, if not most, agave producers use to convert this inulin into "nectar" is VERY similar to the process by which cornstarch is converted into HFCS1.
Though processing methods can differ among manufacturers, most commercially available agave is converted into fructose-rich syrup using genetically modified enzymes and a chemically intensive process involving caustic acids, clarifiers, and filtration chemicals. Here is a partial list of the chemicals many producers use:
Activated charcoal
Cationic and ionic resins
Sulfuric and/or hydrofluoric acid
Dicalite
Clarimex
Inulin enzymes
Fructozyme
How natural does this sound?
The result is highly refined fructose syrup, along with some remaining insulin.
Most agave "nectar" is neither safe nor natural with laboratory-generated fructose levels of more than 80 percent!
Is There Really a "Safe" Organic Agave?
Part of the problem leading to the confusion is that there are some natural food companies that are indeed committed to excellence and in providing the best product possible. But let me assure you that in the agave industry, this is the minority of companies.
Nevertheless, these ethical companies seek to provide an outstanding product. There are a few companies who commit to and actually achieve these criteria and actually:
Work with the indigenous people,
Use organic agave as the raw material, free of pesticides
Process it at low temperatures to preserve all the natural enzymes
Produce a final agave product that is closer to 50% fructose instead of over 90%
Fructose is bonded or conjugated to other sugars and not floating around as "free" fructose, like HFCS, which is far more damaging.
The VAST majority of companies however do not apply these principles and essentially produce a product that is, as this articles states, FAR worse than HFCS.
If you are going to use agave you will certainly want to seek out one of the companies that adhere to the principles above. However you will still need to exert caution in using it.
Just like fruit it is quantity issue. Fructose only becomes a metabolic poison when you consume it in quantities greater than 25 grams a day. If you consume one of the typical agave preparations that is one tablespoon, assuming you consume ZERO additional fructose in your diet, which is VERY unlikely since the average person consumes 70 grams per day.
Even a hundred years ago, long prior to modern day food processing, the average person consumed 15 grams a day.
Listen to YOUR Body
Many people will not be convinced by my arguments and data. They certainly can choose to do that but they are only hurting themselves. Fortunately there is a very simple way to learn if the fructose level you are consuming is safe.
When you consume fructose over 25 grams per day it will very likely increase its metabolic byproduct, uric acid, in your blood. So you can go to your physician and have a simple uric acid level done.
This is not a fasting test and is very inexpensive to do, it's typically free with many automated chemistry profiles.
If your level is above 5.0 you will want to consider reducing your fructose level until the level drops below 5.0. This will provide you with a valid, objective parameter to let you know if the information I am sharing is correct for you and your family.

http://www.huffingtonpost.com/dr-mercola/agave-this-sweetener-is-f_b_537936.html


Why Agave Nectar is Not Worse Than High-Fructose Corn Syrup

Fructose is not inherently evil

Agave nectar is high in fructose, but so are many foods that we eat. This is Dr. Mercola’s main beef with agave nectar. And while it is true that agave is quite high in fructose, it is the most common form of sugar in all fruits. Dates, molasses, raisins, apples, honey, and even many vegetables and other plants are high in fructose. Fructose is a natural form of carbohydrate, and for thousands of years, it has been an important source of energy for the body.
In fact, fructose in live raw fruits is good for us! A scientific statement from The American Heart Association found that consuming limited amounts of fructose, in a pure form, had no negative effects on the majority of individuals. Other studies show that fructose, in limited amounts, may even reduce the risk of prostate cancer.
Another study found that the beneficial fructans found in agave may help fight bone diseases such as osteoporosis, as well as other diseases such as diabetes and colon cancer. This research also suggested that fructans may promote the creation of beneficial gut bacteria, allowing for better absorption of calcium and magnesium (two important minerals for bone health).

Fructose & HFCS are not the same

There is no comparison between a natural form of fructose, such as in fruit or from agave, and the chemically-processed, pesticide-laden, genetically-modified High-Fructose Corn Syrup (HFCS). The fructose in agave is a slow release form of sugar. This means that, in comparison to HFCS, which spikes blood sugar levels, agave does not cause the stimulation insulin secretion that leads to harmful rises in blood sugar. What is more, the enzymatic processing of agave is very different from the process of High-Fructose Corn Syrup, which fabricates fructose out of the glucose made from the milled starch of corn.
For High-Fructose Corn Syrup, glucose chains in the starch are broken down into long chain lengths of glucose molecules. These long chains are less sweet, but offer easier viscosity and functionality than raw glucose.
Producers of HFCS are looking for this better viscosity and adaptability, as it allows them to add it, unnoticed, to virtually any substance. To do this, they dry the corn and mix it with water and sulfar dioxide.
From there, the starches are separated from the kernel, fiber and protein. The separated starch slurry is then processed at very high temperatures, mixed with acid, neutralized, and then treated with an enzyme to create a 42% fructose and 55% glucose syrup. It is these strong acids and caustic chemical additives that are believed to be related to mercury contamination in HFCS. Moreover, most HFCS is made from genetically-modified corn, adding yet another contaminant into the processing mix.
Organic agave nectar’s processing could not be further related from this aforementioned processing of High-Fructose Corn Syrup. Agave is processed through either the use of natural enzymes, or through the use of thermal hydrolysis. These processes are essentially used only to evaporate the nectar from the liquid juice that is extracted from the plant. The processing of agave is done in the exact same way in which bees make honey, whether through a natural enzyme in the bee’s stomach, or when they fan their wings to evaporate the natural water out of the sweet liquid before capping into the honey comb.
In essence, no refinement, beyond the evaporation of water, occurs in agave processing. To put this in perspective, one must consider that hydrolysis is a 100% natural process of molecule separation. The human body does it every day!

http://www.globalhealingcenter.com/natural-health/agave-nectar/

Now, we move onto the recipe that you came for, I like these really cold and a bit hard so I keep them in the freezer but you can eat them room temp or cold out the fridge.

GF RAW VEGAN BLUEBERRY BON-BONS:

Ingredients:
1 1/4 Cup ground almond flour
3 Tbsp ground tiger nuts
1 Tbsp cinnamon (yes, a tablespoon is right, not a teaspoon.)
1/4 tsp pink sea salt
1/4 Cup dried blueberries
2 Tbsp hemp protein powder
3 Tbsp dark maple syrup
1 Tbsp coconut oil
1 Tbsp extra virgin olive oil


Method:
-In a bowl, mix all dry ingredients, mix in blueberries, stir.
-Add oils and maple syrup, then mix with your hands, should clump together and easily form in your hands.
-Roll into bite sized balls, this recipe makes 12 regular sized bites but I make them a bit bigger so I get 10. Place on parchment paper as you roll them out so they don't stick.
-Chill in fridge for 2-3 hours, I like mine frozen but you can also make them and eat them room temperature.


These last 5-7 days in the fridge, (I always finish them before 7 days) and up to 4 weeks in the freezer (I don't keepthem in the freeer longer because the nuts pickup flavours and get freezer burn quickly.)
This is a fun recipe to do with the kids because it's easy, no cooking or baking is involved, and they are fun to roll. I like to introduce raw vegan or healthy foods to people with these kinds of recipes. Leave your comments down below and don't forget to subscribe!